Time Machine Backup Failing: Common Causes and Fixes
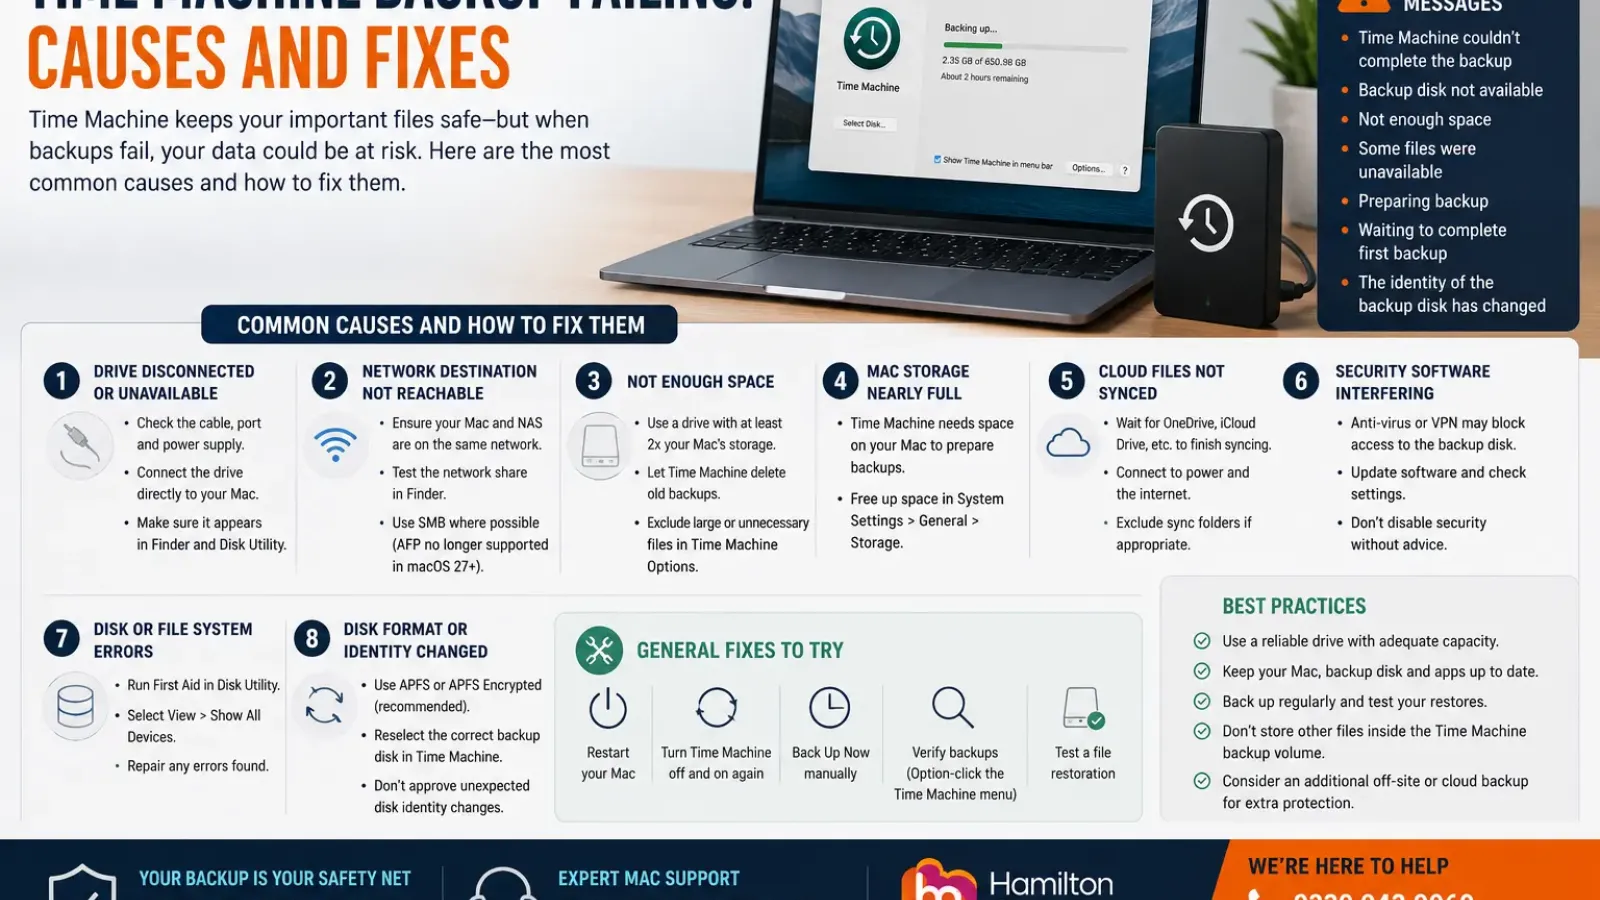
Time Machine is one of the most useful protection features built into macOS. Once configured, it can automatically back up applications, documents, photographs, email and other files to an external drive or supported network destination.
However, a backup system is valuable only when it is completing successfully.
You may see messages such as:
- Time Machine couldn’t complete the backup
- Backup disk not available
- Not enough space
- Some files were unavailable
- Preparing backup
- Waiting to complete first backup
- The identity of the backup disk has changed
In other cases, Time Machine may appear to run normally but remain stuck for hours, repeatedly restart or fail to update the date of the latest successful backup.
The problem may be as simple as a loose cable, but it can also indicate insufficient storage, network instability, disk corruption, incompatible security software or a failing backup drive.
Here are the most common causes and the steps you can take to fix them.
First, Confirm That the Backup Has Actually Failed
The first Time Machine backup can take considerably longer than later backups because it must copy a much larger quantity of information. After the initial backup, Time Machine normally copies only files that have changed, so subsequent backups should be quicker.
To check the current status:
- Open System Settings.
- Select General.
- Select Time Machine.
- Review the date and time of the latest backup.
- Select the Time Machine icon in the menu bar for more information.
A backup that is progressing slowly is different from one that repeatedly stops with an error.
Allow a large first backup enough time to finish, particularly when using a network destination. Keep a MacBook connected to power and avoid disconnecting the drive while the backup is active.
Cause 1: The Backup Drive Is Disconnected or Unavailable
Time Machine cannot complete a backup when macOS cannot communicate reliably with the destination.
For a directly connected drive, check:
- The USB-C, Thunderbolt or USB cable.
- The port on the Mac.
- The drive’s power supply.
- Whether the drive appears in Finder.
- Whether an adapter or docking station is involved.
- Whether the drive disconnects when moved.
Apple recommends connecting the backup disk directly to the Mac rather than through a USB hub or another device when troubleshooting backup failures.
Try a Direct Connection
Disconnect the drive safely, then reconnect it directly to another compatible port on the Mac.
Where possible, test with:
- Another approved cable.
- Another port.
- The drive’s original power adapter.
- No docking station or hub.
- Another Mac.
If the drive does not appear in Finder or Disk Utility after these checks, it may have a hardware, cable or power fault.
Check the Drive in Finder
Open Finder and look under Locations.
If the disk appears, select it and confirm that you can open it. Do not manually move, rename or delete Time Machine backup files.
If the disk does not appear, open Disk Utility and choose:
View > Show All Devices
Apple advises checking the connections, cable and power when an external storage device is missing from Disk Utility. If the device still cannot be detected, the Mac or storage device may require service.
Cause 2: The Network Backup Destination Cannot Be Reached
Time Machine can back up to certain network-attached storage devices, another Mac configured as a backup destination and other supported network storage.
Network backups depend on more than the backup disk itself. The Mac, router, switches, wireless access points and network server must all remain available.
Check whether:
- The Mac is connected to the correct network.
- The NAS or destination Mac is switched on.
- The network share is accessible in Finder.
- The server address or password has changed.
- The Mac is moving between Wi-Fi networks.
- A VPN is interfering with local network access.
- The NAS has installed firmware updates.
- Other Macs can reach the same destination.
Apple recommends making sure that both the Mac and the network backup disk are connected to the network. Network problems can make the backup destination unavailable even when the disk itself is operating normally.
Verify an Existing Network Backup
Where a previous network backup completed successfully, hold Option while opening the Time Machine menu and choose Verify Backups.
This option can help check the consistency of a supported network backup.
Use SMB Where Supported
Modern network destinations should support Time Machine over SMB. Apple currently recommends SMB rather than AFP where a choice is available. Apple has also announced that AFP-based Time Machine backup to NAS devices will not be supported in macOS 27 or later.
Businesses still relying on older Time Capsules, AirPort equipment or AFP-based NAS configurations should therefore plan an upgrade rather than waiting for the existing arrangement to stop working.
Cause 3: The Backup Disk Is Full
Time Machine normally removes the oldest backups as the destination fills. However, it may still report that the disk does not have enough space, particularly when the backup set has grown significantly or a large amount of new information needs to be copied.
Apple recommends using a Time Machine disk with at least twice the storage capacity of the Mac. A Mac with 1 TB of storage should therefore ideally use a backup destination with at least 2 TB.
Check the Backup Drive’s Capacity
- Open Finder.
- Select the Time Machine disk.
- Choose File > Get Info.
- Review its capacity and available space.
If the drive is too small, the best option is normally to move to a larger backup disk rather than deleting backup contents manually.
Do not open the backup folder and remove individual dates or files. Manually altering the Time Machine structure can damage the backup set.
Exclude Unnecessary Information
Open:
System Settings > General > Time Machine > Options
Use Exclude from Backups to remove content that is unnecessary or protected through another approved recovery process. Apple provides this setting specifically for files and folders that should not be included in Time Machine.
Possible exclusions may include:
- Very large temporary files.
- Virtual-machine images protected elsewhere.
- Replaceable installation files.
- Cache folders identified by the application supplier.
- Large working data that has a separate backup system.
Do not exclude business information simply to make warning messages disappear. Confirm that another reliable recovery copy exists first.
Cause 4: The Mac’s Internal Storage Is Nearly Full
The destination drive is not the only storage that matters.
Time Machine may need temporary space on the Mac’s startup disk while preparing and completing the backup. Apple warns that Time Machine may fail when the startup disk is nearly full because macOS cannot save the temporary data required.
Check the Mac’s storage through:
System Settings > General > Storage
Review:
- Downloads.
- Unused applications.
- Large email attachments.
- Video files.
- Old device backups.
- Virtual machines.
- Previous installation files.
- Duplicate local and cloud copies.
Do not delete unfamiliar system files or move confidential business data to an unapproved personal account.
After freeing space:
- Empty the Bin.
- Restart the Mac.
- Reconnect the backup drive.
- Choose Back Up Now.
Cause 5: Cloud Files Have Not Finished Synchronising
Time Machine can report that certain files cannot be backed up while a cloud service is still downloading, uploading or updating them.
This may affect services such as:
- Microsoft OneDrive.
- SharePoint synchronisation.
- iCloud Drive.
- Dropbox.
- Google Drive.
- Other cloud document platforms.
Apple advises keeping the Mac connected to power and the internet so that cloud synchronisation can complete. Sync folders can also be excluded temporarily if the business does not want to wait, although this should only be done when the organisation understands how those files are otherwise protected.
Check the relevant cloud application for:
- Pending uploads.
- Download errors.
- Conflicted files.
- Paused synchronisation.
- An expired sign-in.
- Insufficient cloud storage.
- Files that are available online only.
A cloud synchronisation service is not necessarily the same as an independent backup. Removing cloud folders from Time Machine may reduce the number of recovery options available after accidental deletion or account compromise.
Cause 6: Security Software Is Interfering
Antivirus, endpoint-security, VPN and file-monitoring applications may inspect the backup disk or interfere with access to a network destination.
Apple notes that antivirus applications can keep the destination busy by repeatedly reading or writing information. It also advises checking VPN and other third-party security software when a backup cannot reach its disk.
This does not mean business security software should simply be disabled.
Instead:
- Confirm that the security software supports the installed macOS version.
- Install its latest approved update.
- Check whether its supplier recommends excluding the Time Machine volume from routine scanning.
- Review VPN split-tunnelling and local-network access.
- Test while disconnected from the VPN, where company policy permits.
- Ask the IT provider to review logs and settings.
Do not permanently remove endpoint protection, monitoring or device-management tools to fix a backup error. The correct solution is to make the security and backup products operate together safely.
Cause 7: The Backup Disk Contains File-System Errors
A cable disconnection, power loss, failing drive or interrupted write can leave errors on the backup disk.
Disk Utility’s First Aid feature can check the disk’s directory structure and attempt to repair supported problems.
Run First Aid
Before starting, avoid making unnecessary changes to the disk and protect any other important information stored on it.
- Stop the Time Machine backup.
- Open Disk Utility.
- Select View > Show All Devices.
- Select the Time Machine volume.
- Click First Aid.
- Select Run.
- Repeat the check for the container and physical disk where appropriate.
- Restart the Mac.
- Retry the backup.
If First Aid reports errors it cannot repair, Apple’s remaining options include erasing the disk and starting a new backup or trying another backup device. Erasing permanently removes the existing backup history, so it should be used only after safer options have failed.
Repeated disk errors are a warning sign. Reformatting a failing physical drive may make it appear functional temporarily without resolving the hardware problem.
Cause 8: The Disk Format or Partition Scheme Is Unsuitable
APFS and APFS Encrypted are Apple’s preferred formats for current Time Machine backup disks. Some older Mac OS Extended backup disks remain supported, but newer APFS-formatted destinations can offer improved Time Machine performance.
A disk formatted solely for Windows cannot be used for Time Machine without being reformatted, which removes its existing contents. Some Master Boot Record partitions may also be unavailable to Time Machine.
Check the Format
- Open Finder.
- Select the backup disk.
- Choose File > Get Info.
- Review the value beside Format.
Alternatively, open Disk Utility and inspect the volume.
Do not erase or reformat the disk until:
- Existing backup history is no longer required.
- Other files on the disk have been protected.
- The correct physical device has been selected.
- The business has approved the change.
- Encryption and recovery-password requirements have been considered.
If the physical drive must also store ordinary files, Apple recommends creating a separate APFS volume rather than placing unrelated files inside the Time Machine volume.
Cause 9: The Identity of the Backup Disk Has Changed
Time Machine includes protections intended to stop a Mac from silently backing up to an unauthorised disk.
It may refuse to continue if the destination’s identity has changed. This can happen after:
- Erasing or reformatting the disk.
- Deleting the network backup image.
- Replacing a NAS.
- Recreating the shared folder.
- Connecting a different disk with the same name.
Apple advises reselecting the backup disk in Time Machine settings after confirming that it is genuinely the correct destination.
Open:
System Settings > General > Time Machine
Remove or forget the unavailable destination, then add the verified backup disk again.
Do not approve an unexpected disk-identity change without investigating it. For a business, confirm the serial number, network destination or storage ownership first.
Cause 10: Time Machine Is Stuck on “Preparing Backup”
The preparation stage can take longer when:
- The first backup is being created.
- A large amount of information has changed.
- The previous backup was interrupted.
- The Mac has recently been upgraded.
- Large application files change frequently.
- The destination is slow.
- Security software is scanning the disk.
- A network backup is validating its existing data.
Apple highlights large, frequently updated files as a reason Time Machine may take a long time. If an application stores its information in one very large database, a small internal change can cause that large file to be backed up again.
Give the process sufficient time before interrupting it.
If it remains at the same stage for an unreasonable period:
- Stop the backup through the Time Machine menu.
- Restart the Mac.
- Reconnect the drive directly.
- Check available space.
- Update macOS.
- Run Disk Utility First Aid.
- Retry Back Up Now.
Avoid deleting hidden Time Machine files or running unverified Terminal commands from older online guides.
Cause 11: Some Files Are Unavailable While the Mac Is Locked
Time Machine may report that certain files were unavailable.
Apple notes that protected files can sometimes require the Mac to be unlocked. It recommends completing a manual backup while the user is signed in and the Mac is unlocked, or allowing a later automatic backup to try again.
Connect the Mac to power, sign in and choose:
Time Machine menu > Back Up Now
Keep the Mac awake until the backup finishes.
On a centrally managed Mac, settings controlling sleep, battery use and FileVault may affect when backup data becomes available.
Cause 12: The Backup Drive Is Beginning to Fail
External hard drives and solid-state drives do not last forever.
Possible warning signs include:
- Repeated disconnections.
- Clicking or unusual noises.
- Very slow transfers.
- Disk Utility errors.
- Backups repeatedly becoming corrupted.
- The drive disappearing from Finder.
- Failure on multiple cables or Macs.
- Excessive heat.
- Failed firmware updates.
Do not continue relying on a disk that repeatedly shows these symptoms.
Create a new backup on another supported drive as soon as possible. Keep the older disk untouched until the new backup has completed and a test restoration has succeeded.
The objective is not simply to make the warning disappear. It is to ensure that recoverable business information exists on reliable storage.
Test That Your Backup Can Restore Files
A “Backup completed” message does not prove that every required file can be recovered.
Periodically test Time Machine by restoring a non-critical file:
- Create or identify a test document.
- Confirm that it has been included in a completed backup.
- Remove or rename the local copy.
- Open Time Machine.
- Navigate to an earlier backup.
- Restore the file.
- Open it and check its contents.
Time Machine can also use local snapshots to provide previous versions while the external backup disk is unavailable. Apple states that it normally creates approximately hourly startup-disk snapshots and retains them for limited periods as storage permits.
Local snapshots are useful, but they remain on the Mac. They will not protect the business if the device is stolen, severely damaged or completely inaccessible.
Do Not Rely on Time Machine Alone
Time Machine provides valuable local protection, but a business should consider what would happen if both the Mac and its nearby backup drive were affected by the same incident.
Examples include:
- Theft.
- Fire.
- Flooding.
- Electrical damage.
- Ransomware.
- Deliberate deletion.
- Loss during travel.
A stronger strategy may combine:
- Time Machine.
- Approved cloud file storage.
- Microsoft 365 backup.
- Encrypted off-site backup.
- Application-specific protection.
- Documented recovery procedures.
- Regular restoration tests.
The appropriate arrangement depends on the information stored on the Mac and how quickly the business must recover it.
A Quick Time Machine Troubleshooting Checklist
Work through these steps in order:
- Confirm the latest successful backup date.
- Allow a large first backup enough time to finish.
- Connect the disk directly to the Mac.
- Test another cable and port.
- Confirm that the disk appears in Finder and Disk Utility.
- Check the backup disk’s available space.
- Check the Mac’s internal free storage.
- Complete cloud-file synchronisation.
- Update macOS and security software.
- Check network connectivity for NAS backups.
- Reselect the verified backup destination.
- Run Disk Utility First Aid.
- Update the drive or NAS firmware.
- Test a file restoration.
- Replace a disk that repeatedly disconnects or reports errors.
- Erase and rebuild the backup only as a final step.
How Hamilton Group Can Help
A failed Time Machine backup may be caused by a simple connection problem, but it can also be the first warning that a drive, network destination or wider recovery process is no longer reliable.
Hamilton Group can investigate the failure, protect existing backup data and create a more dependable business recovery strategy.
Our Mac backup services can include:
- Time Machine troubleshooting.
- External backup-drive setup.
- Encrypted backup configuration.
- NAS and network backup support.
- Disk Utility and file-system checks.
- Microsoft 365 backup.
- Online and off-site backup.
- Backup monitoring and reporting.
- Test restorations.
- Disaster-recovery planning.
- Mac and Microsoft Intune management.
- Ongoing business IT support.
Hamilton Group aims to make first contact on IT support requests within 15 minutes, helping employees receive an early response when backup problems put business information at risk.
To discuss Mac backup and recovery for your business, contact Hamilton Group on 0330 043 0069 or visit hgmssp.com.